A Revolutionary paver edging system
DO IT ONCE, DO IT RIGHT
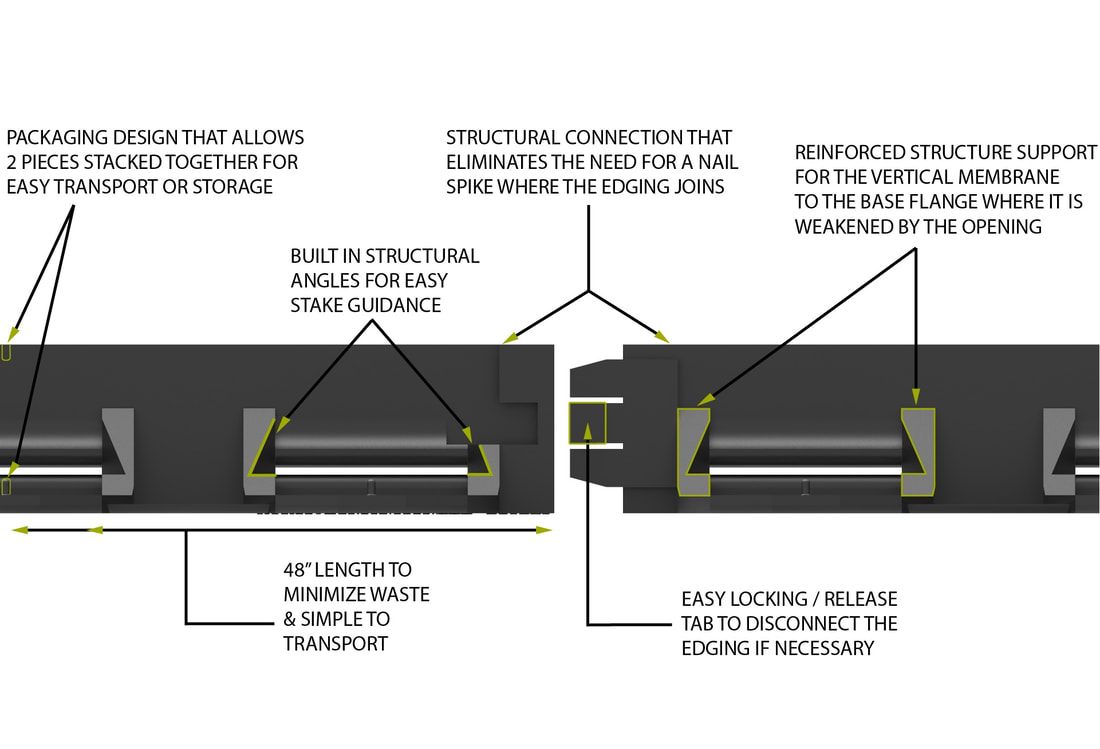
Edgelock® edging is an industry changing patented technology.
Designed for the contractor and embraced by the homeowner.
A simple idea that uses the weight of the unit paver in keeping
the edging and nail spikes secure on your project over time.
Designed for the contractor and embraced by the homeowner.
A simple idea that uses the weight of the unit paver in keeping
the edging and nail spikes secure on your project over time.
Edgelock®
Paver Edging
|
|
|
|
Edgelock® Edging is precisely engineered with quality materials
The Edgelock® Stake
Which one is right for your application?
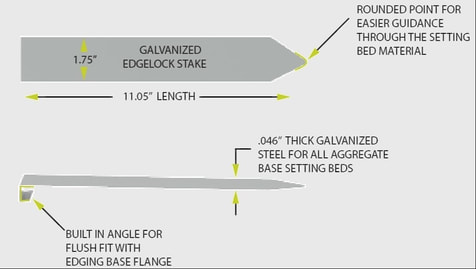
Galvanized Stake for use with
limestone and/or sand setting bed applications |
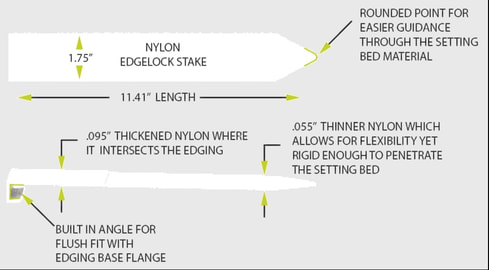
Nylon Stake for use with
sand setting bed applications |
Installation
Follow these step by step instructions to install our premier edging:
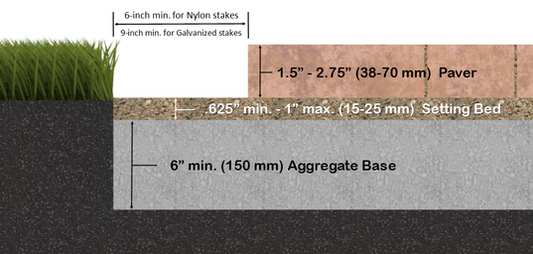
Installation Requirements:
|
Step 1: Remove setting bed
Use a trowel to completely remove the setting bed material away from the paver so the top of the aggregate base is exposed.
|
Step 2: Insert Edging & Nail SpikesFor curved applications, simply cut the rigid connection strips prior to installation. The edging is designed to snap easily together and can be done prior or during the installation process.
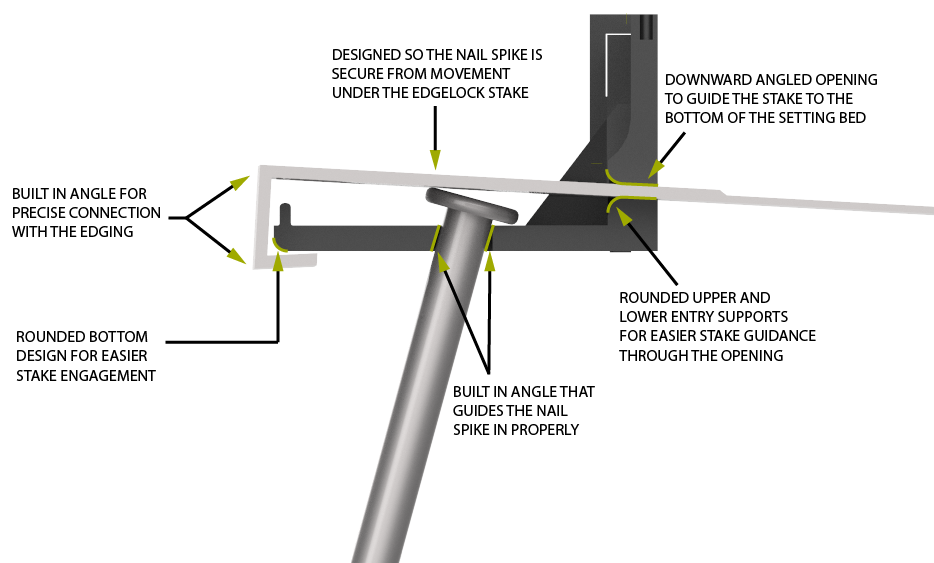
Place the edging firmly against the pavers and on top of the aggregate base. Drive the nail spike all the way in and continue. There is an angle built into the edging that will help direct the nail into the proper position for maximum strength. |
Step 3A: Galvanized Stake Installation
Edgelock stakes are designed to be placed over each nail spike. Before inserting the stake, position it at the appropriate angle (see figures 1-4) ensuring that it crosses a minimum of 1 or more paver joints. Insert the stake into the opening of the edging and simply push in as far as you can by hand. Then use a hammer to tap the stake in completely so the return of the stake engages with the edging.
|
Step 3B: Nylon Stake Installation
For nylon stake applications, bend the stake into the opening and follow the steps in 3A to complete the installation.
|
Step 4: Backfill to Finish Grade
Backfill over the edging to finish grade. Fill in the pavers with jointing sand and compact.
|
MATERIAL CALCULATION:
EDGING, STAKES, AND NAIL SPIKES
EDGING, STAKES, AND NAIL SPIKES
I. Calculate the number of Edgelock® Edge Strips needed:
II. Calculate the base number of Edgelock® Stakes:
• # of edge strips x 4 (12" spacing for driveways)
III. Calculate the number of additional Edgelock® Stakes:
- Take the linear feet of the perimeter to be edged and divide by 4 to get the total number of Edgelock strips needed.
II. Calculate the base number of Edgelock® Stakes:
- Determine your application and multiply the number of Edgelock® Strips as follows
• # of edge strips x 4 (12" spacing for driveways)
III. Calculate the number of additional Edgelock® Stakes:
- Count each edging start and stop point in the project and divide the total number by 2. See Figure A below.
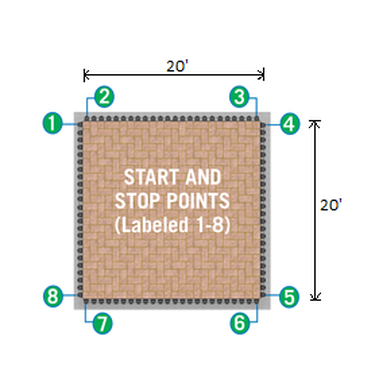
FIGURE A
|
Example: 20' x 20' Square Patio (16" spacing)
(Perimeter: 20' + 20' + 20' + 20' = 80 LF) I. 80 LF ÷ 4 = 20 Edgelock® Strips. II. 20 Edgelock® Strips x 3 = 60 Edgelock® Stakes. III. Start and stop points: 8 ÷ 2 = 4 additional Edgelock® Stakes. Order Summary:
|
Recommended Stake Placement
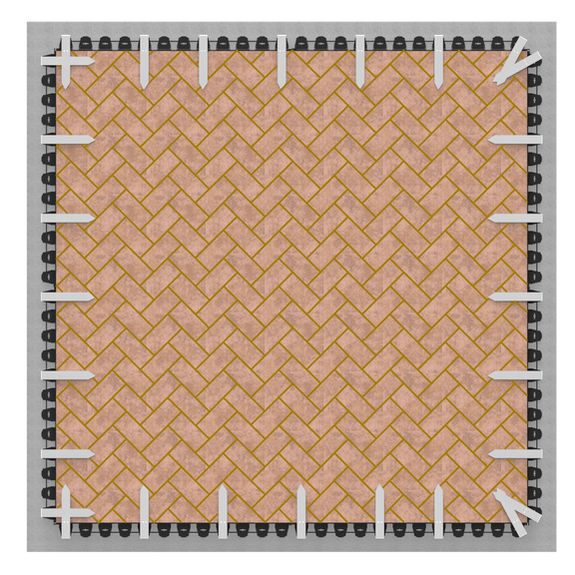
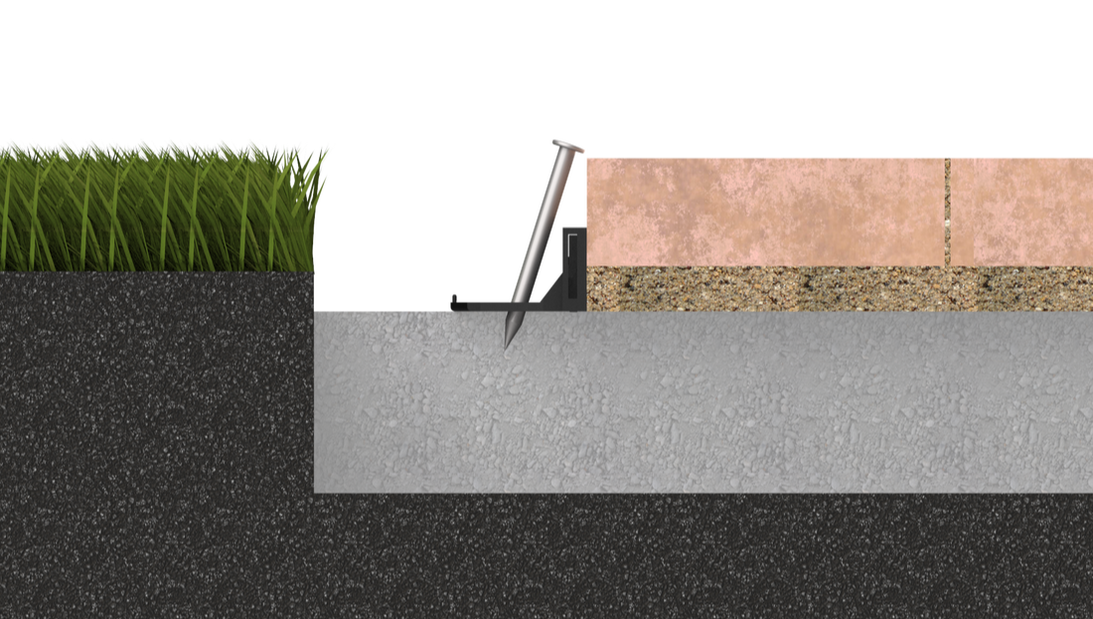
Figure 1:
45 Degree Installation Insert the stake straight to cross multiple joints. |
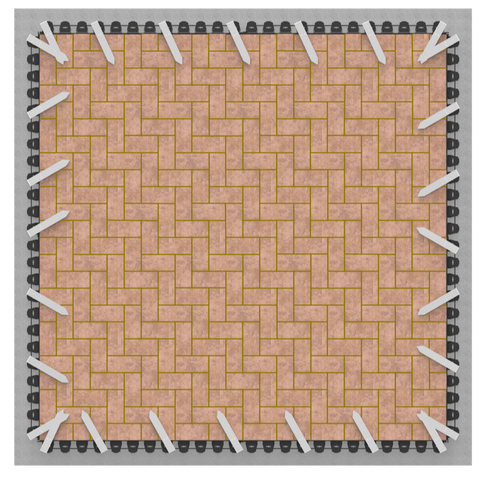
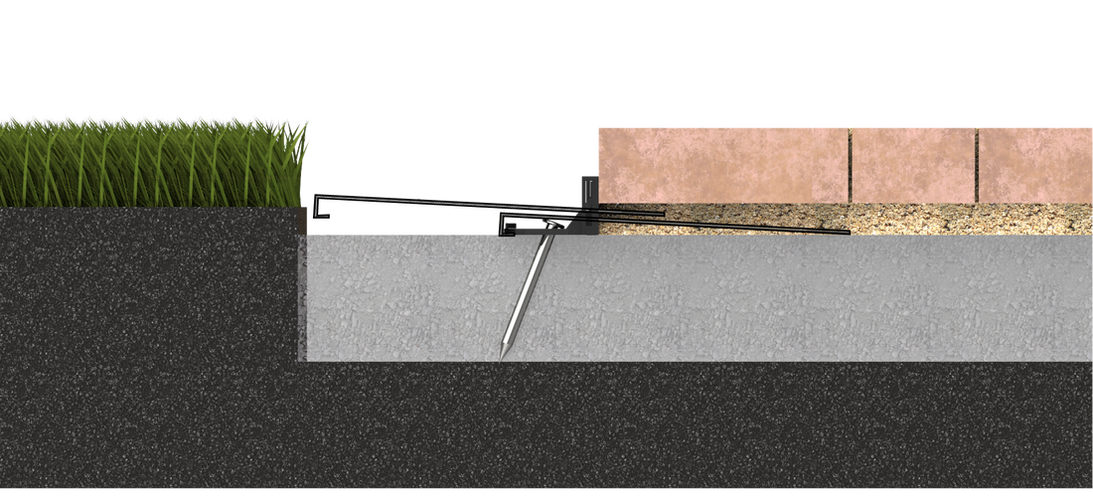
Figure 2:
90 Degree Installation Insert the stake at an angle to cross multiple joints. |
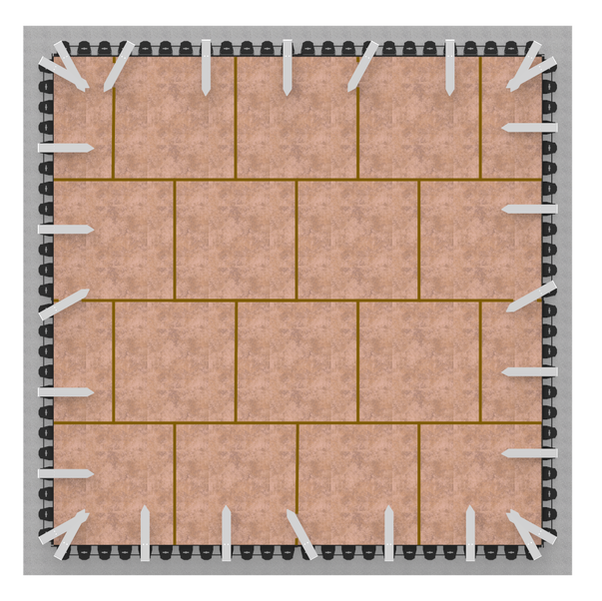
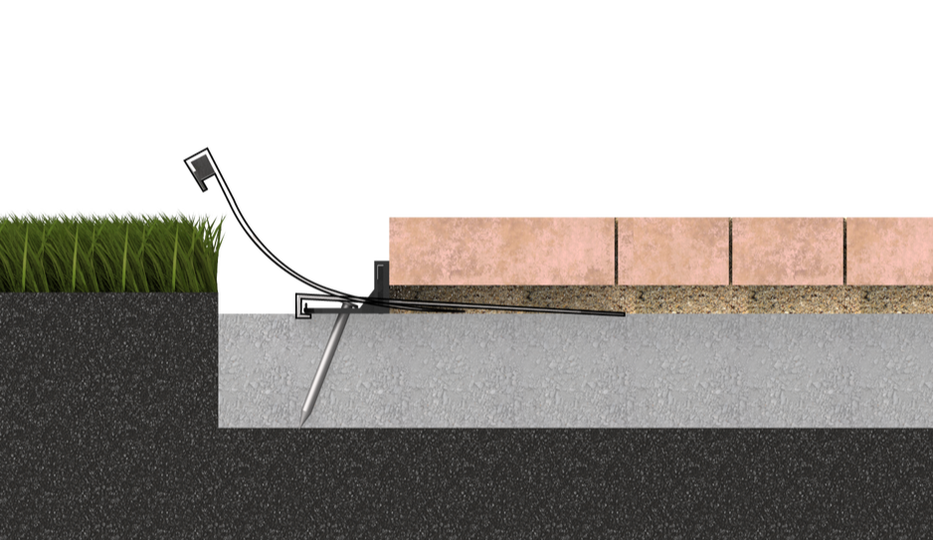
Figure 3:
Slab Installation Insert the stake at an angle if able to cross a joint, try to cross as many joints as possible. If unable to cross a joint insert stake straight. |
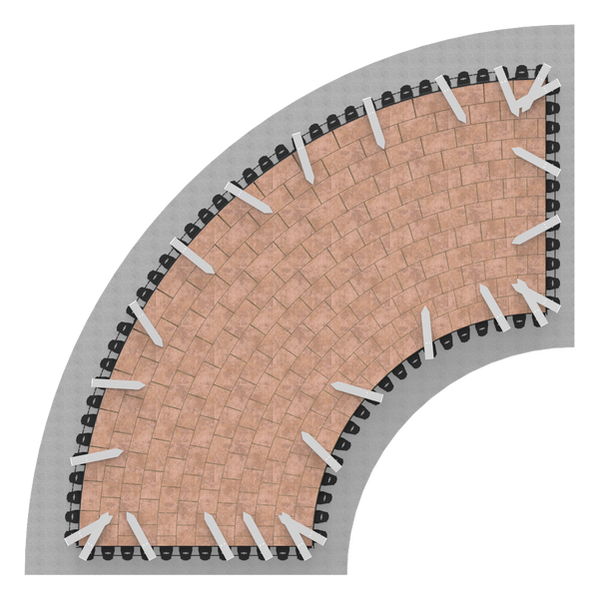
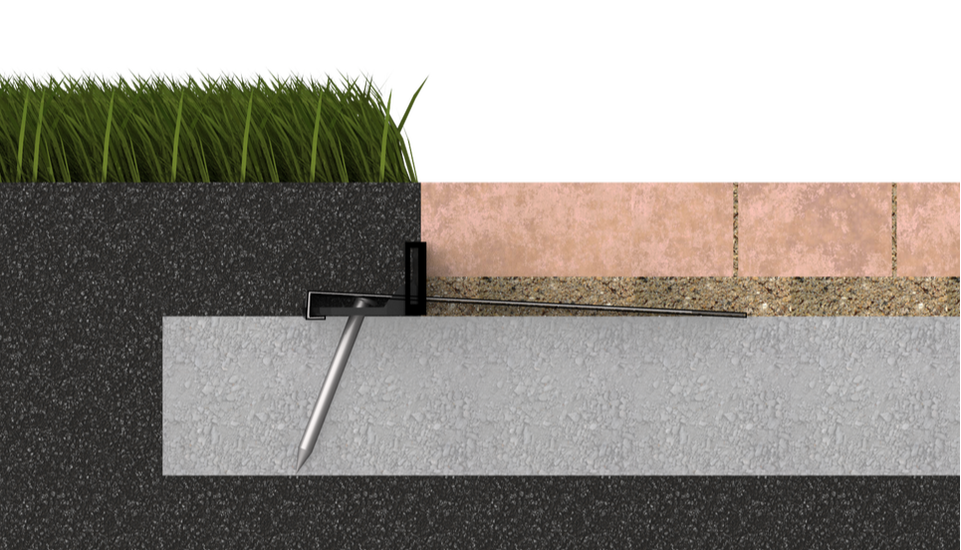
Figure 4:
Radius Installation Cross as many joints as possible, stakes may overlap at corners. For radius applications, simply cut the rigid connection strips prior to installation. The edging is designed to snap easily together and can be done prior or during the installation process. |
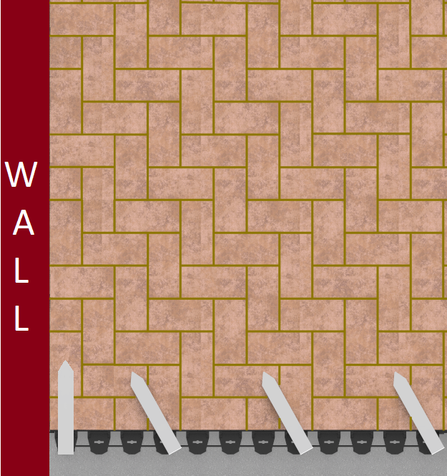
Figure 5:
Fixed Structure Installation Insert the stake straight next to a wall or driveway and then continue with the normal installation guidelines. |
|
Click on the link below to download our brochure
|
| ||
Click on the video below to see how quick and easy it is to install Edgelock
What Are People Saying?
"I was blown away at how easy it was to install!"
-Benjamin Parrotta, DLD Custom Stone
-Benjamin Parrotta, DLD Custom Stone
“Finally there is an industry solution for what has been an ongoing problem with paver installations”
-Jamie DeLauro, Delauro Brothers Contracting
-Jamie DeLauro, Delauro Brothers Contracting